What is Blind Baking (And Why Bother)?
Blind baking means pre-baking a pie or tart shell before adding the filling. It sounds like extra work, but for certain pies, it’s absolutely essential.
When You MUST Blind Bake:
- Custard pies (pumpkin, chess pie)
- Cream pies (chocolate, banana cream)
- Quiches
- Fresh fruit tarts
- Any no-bake filling
Why It’s Non-Negotiable: Without pre-baking, wet fillings make the crust soggy and undercooked. You’ll end up with raw, doughy pastry - nobody wants that!
The Complete Blind Baking Process
Step 1: Prepare Your Pastry
- Roll out pastry to 3-4mm thickness
- Line your pie dish, leaving 2cm overhang
- Gently press pastry into corners (no air pockets!)
- Trim excess, leaving 1cm overhang
- Crimp or decorate edges (do this now - not after baking!)
- Dock the bottom - prick all over with a fork (15-20 times)
Why dock? Those holes let steam escape, preventing the bottom from puffing up.
Andy’s tip: Use a cold fork and prick in a pattern - looks professional!
Step 2: Chill the Lined Shell (Critical!)
- Place lined shell in freezer for 15-30 minutes (or refrigerator for 1 hour)
- This firms up the butter, preventing shrinkage
- Don’t skip this - it makes a HUGE difference!
Why chill? Cold pastry holds its shape better. Warm pastry = sagging sides and shrinking.
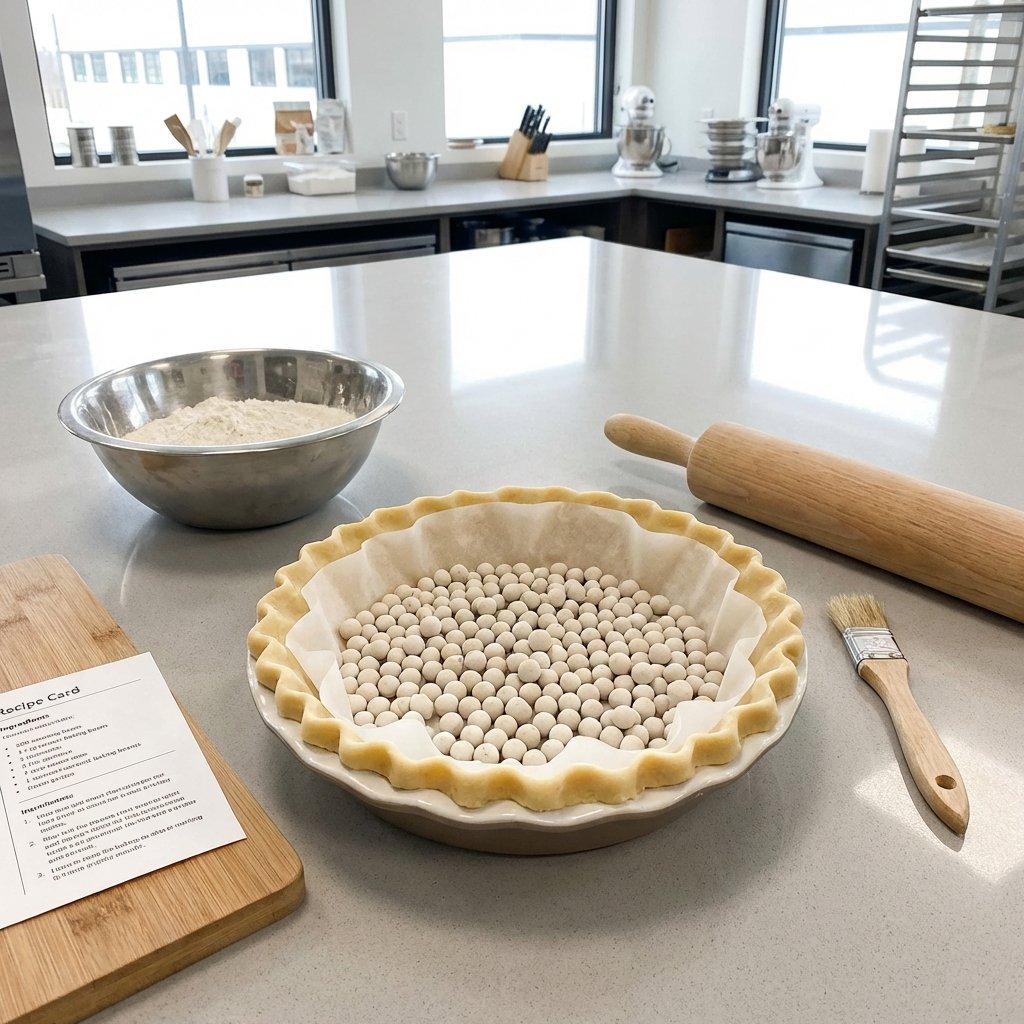
Step 3: Line with Parchment and Weights
- Cut parchment paper larger than your pie (needs to come up sides)
- Crumple paper into a ball, then unfold (makes it pliable)
- Press parchment snugly into pastry shell
- Fill with pie weights, dried beans, or rice
- Fill almost to the top - weights hold sides up
Andy’s trick: I fold the parchment to create “handles” for easy removal!
Step 4: First Bake (Partial Blind Bake)
Temperature: 200°C (390°F) Time: 15-20 minutes What to look for: Edges just starting to turn golden
During this bake:
- Pastry sets and firms up
- Sides stay upright (thanks to weights!)
- Bottom stays flat (thanks to docking!)
Don’t skip the preheat! Oven must be fully at temperature.
Step 5: Remove Weights and Paper
- Carefully lift out parchment with weights (careful - very hot!)
- Check the bottom - should be dry but pale
- If any cracks appeared, patch with raw pastry scraps
- Return to oven immediately for second bake
Common issue: If bottom has puffed up despite docking, gently press down with a clean towel.
Step 6: Second Bake (Complete the Blind Bake)
For partially blind-baked shells (will bake again with filling):
- Bake 5 more minutes
- Bottom should be dry but still pale
- Use for: quiche, pumpkin pie, any filled-then-baked pie
For fully blind-baked shells (no further baking):
- Bake 10-15 more minutes
- Bottom should be golden brown all over
- Use for: cream pies, fresh fruit tarts, no-bake fillings
How to tell when done:
- Bottom is golden (lift carefully to check)
- No raw-looking areas
- Pastry feels firm, not soft
Step 7: Cool Completely
- Transfer to wire rack
- Cool for at least 30 minutes
- Must be completely cool before adding filling
Why cool? Hot pastry + cool filling = soggy crust. Patience pays off!
Choosing the Right Pie Weights
Option 1: Ceramic or Metal Pie Weights (Best!)
Pros: Reusable forever, perfect weight, conduct heat evenly Cons: Initial cost ($15-25) Andy’s pick: Worth the investment if you bake often
Option 2: Dried Beans or Rice (Budget-Friendly)
Pros: Cheap, readily available, reusable many times Cons: Don’t conduct heat as well, eventually go stale Tips:
- Use cheaper beans (not your fancy organic ones!)
- Store in labeled jar after use
- Replace when they start to smell stale
Option 3: Sugar (Works in a Pinch)
Pros: Conducts heat well, reusable Cons: Can caramelize if too hot When to use: Emergency only!
Option 4: Chain Method (Professional)
Pros: Conforms perfectly to any shape Cons: Expensive ($40+) What it is: Heavy metal chain that distributes weight evenly
Common Blind Baking Problems (And Solutions!)
Problem: Pastry Shrinks Down the Sides
Causes:
- Didn’t chill before baking
- Overworked the dough
- Stretched pastry when lining dish
Solutions:
- Always chill 15+ minutes
- Handle dough gently
- Let pastry naturally settle into dish
- Leave extra overhang for insurance
Problem: Bottom Puffs Up Like a Balloon
Causes:
- Didn’t dock enough
- Air trapped under pastry
- Not enough weights
Solutions:
- Prick bottom 20+ times before baking
- Press pastry firmly into corners
- Use more weights next time
- If it puffs during baking, carefully press down
Problem: Pastry Cracks or Breaks
Causes:
- Too dry (not enough water in dough)
- Overbaked
- Removed weights too early
Solutions:
- Patch cracks with raw pastry + water
- Brush with egg white to seal
- Use less baking time next time
Problem: Bottom is Still Pale/Raw
Causes:
- Oven not hot enough
- Not baked long enough
- Too much filling prevented browning
Solutions:
- Use oven thermometer to verify temp
- Bake until GOLDEN, not just dry
- Check bottom by lifting tart carefully
Problem: Edges Burning Before Bottom Cooks
Causes:
- Oven too hot
- Top rack position
- Thin edges vs thick bottom
Solutions:
- Cover edges with foil halfway through
- Use pie crust shield
- Ensure even pastry thickness
Advanced Blind Baking Techniques
The Parchment-Free Method (Advanced)
For experienced bakers:
- Dock bottom thoroughly (30+ pricks)
- Chill shell for 30 minutes
- Bake at 200°C without weights
- Watch carefully - rotate if needed
- If bottom puffs, press down with towel
When this works: Very firm, well-chilled pastry Risk: Bottom may puff despite docking
The Egg Wash Seal (Professional Trick)
- After first bake (with weights), brush bottom with egg white
- Return to oven for 2 minutes
- Egg creates waterproof seal
- Especially good for very wet fillings
The Sugar Blind Bake (Tart Method)
- Line with parchment as usual
- Fill completely with granulated sugar
- Bake normally
- Pour out hot sugar (save for caramel!)
- Creates beautifully even browning
Specific Pie Types: Blind Baking Times
Quiche or Savory Tarts:
- Partial blind bake: 15 mins with weights + 5 mins without
- Then: Fill and bake with filling 25-30 mins
Pumpkin or Custard Pies:
- Partial blind bake: 15 mins with weights + 5 mins without
- Then: Fill and bake with filling 45-60 mins
Cream Pies or No-Bake Fillings:
- Full blind bake: 15 mins with weights + 12-15 mins without
- Until: Deep golden brown all over
- Then: Cool and fill (no additional baking)
Fresh Fruit Tarts:
- Full blind bake: 15 mins with weights + 10-12 mins without
- Extra: Brush with chocolate for moisture barrier
- Then: Cool, add pastry cream, arrange fruit
The Professional’s Blind Baking Checklist
Before you start:
☐ Pastry is well-chilled (at least 30 mins rest) ☐ Pie dish is ready and clean ☐ Parchment paper cut to size ☐ Pie weights/beans ready ☐ Fork for docking prepared ☐ Oven fully preheated to 200°C ☐ Timer and oven mitt nearby ☐ Wire rack for cooling ready
Time-Saving Tips
Make Ahead:
- Blind bake shells up to 2 days ahead
- Store at room temp, covered loosely
- Freeze fully blind-baked shells for 2 months
Batch Baking:
- Make 3-4 shells at once
- All fit in oven together
- Freeze extras for later
Quick Method:
- Pre-roll pastry and freeze in discs
- Thaw 20 minutes when needed
- Line dish and blind bake from frozen (add 5 mins)
Key Takeaways
✅ Chill before baking = minimal shrinkage ✅ Dock the bottom generously = no puffing ✅ Use enough weights = sides stay upright ✅ Two-stage baking = perfect doneness ✅ Cool completely before filling = no soggy bottom
Master blind baking and you’ll unlock a whole world of pies and tarts! It’s easier than it looks and makes all the difference in final results.